I created these Graveyard Dirt Cups to bring a spooky, playful dessert to Halloween or themed gatherings. They’re layers of creamy chocolate pudding, “dirt” made from crushed cookies, and fun edible tombstone decorations — individual, no‑bake treats that are both whimsical and delicious.
Why I’ll Love This Recipe
I’m drawn to this recipe because it’s so easy, fun to assemble, and delightful to look at (especially for kids or parties). The contrast of smooth pudding and crunchy “dirt” is satisfying, and decorating with tombstones, gummy worms, and candy gives me a chance to get creative. Plus, it’s no‑bake and portioned, which makes it super convenient.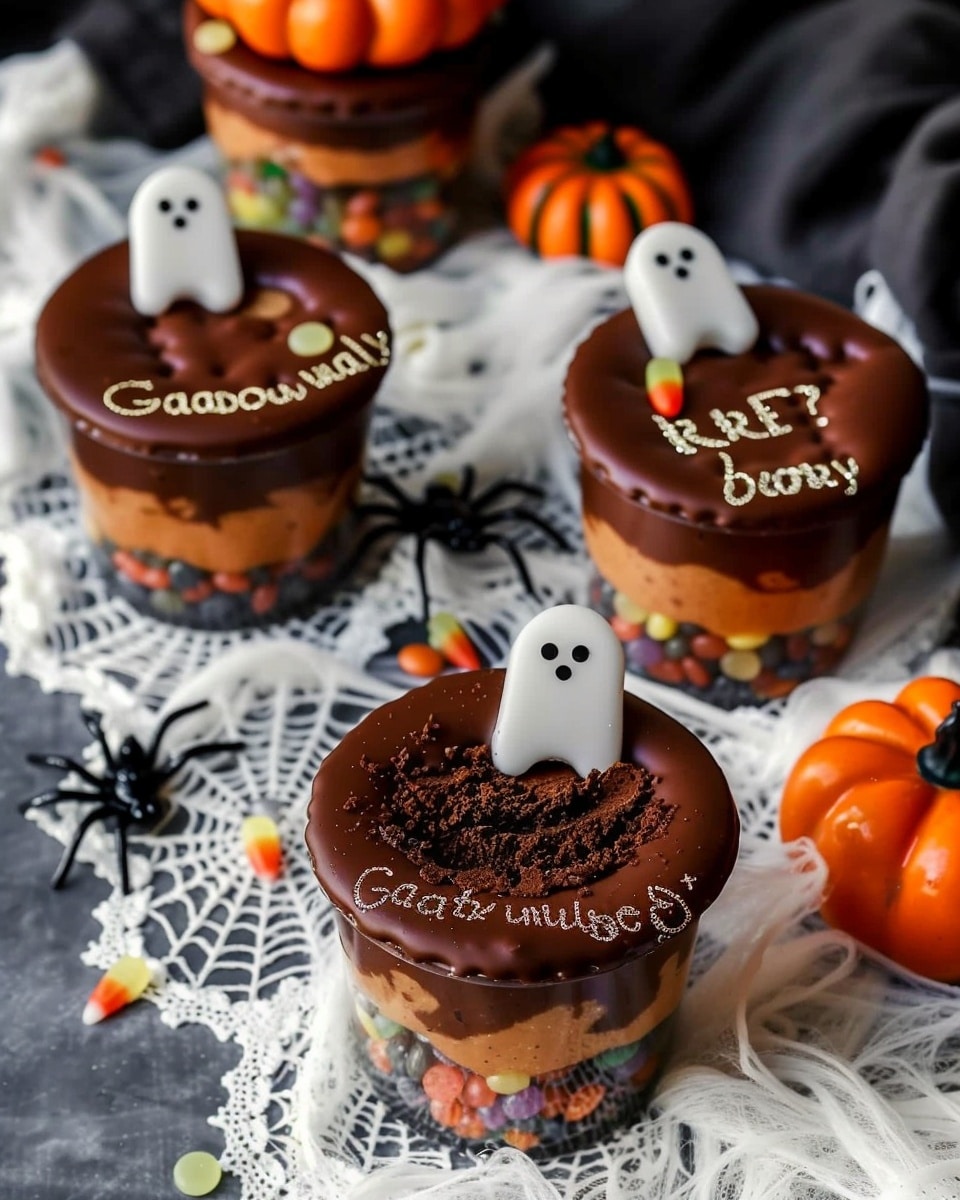
Ingredients
(Here’s a tip: Check out the full list of ingredients and measurements in the recipe card below.)
For the pudding & filling
-
Instant chocolate pudding mix
-
Cold milk
-
Whipped topping (such as Cool Whip or whipped cream)
For the “dirt” layer
-
Chocolate sandwich cookies (e.g. Oreos), crushed
For decoration / graveyard elements
-
Milano cookies, or wafer cookies, or light-colored cookies for tombstones
-
Black icing or melted chocolate (for writing “RIP” or designs)
-
Gummy worms
-
Candy pumpkins, candy eyeballs, ghost candies or sprinkles
-
Optional: edible grave decorations (bones, ghosts, candy embellishments)
Directions
-
Crush the cookies
Use a food processor or a sturdy zip bag and rolling pin to crush the chocolate sandwich cookies into fine crumbs. Reserve a bit for the top garnish. -
Prepare the pudding mixture
Whisk the instant chocolate pudding mix with the cold milk until combined and starting to set (about 2 minutes). Then fold in the whipped topping until smooth and fully integrated. -
Write tombstone decorations
Take your selected cookies (Milano, wafers, etc.) and use black icing or melted chocolate to write “RIP” (or “BOO”) or draw spooky symbols on them. Let these set/harden a little. -
Layer the cups
In each clear serving cup (plastic or glass):-
Add a spoonful of crushed cookie “dirt” at the bottom
-
Add a layer of the pudding‑whipped mixture
-
Add another layer of cookie crumbs
-
Add more pudding if desired
-
Finish with a top layer of cookie crumbs
-
-
Add the tombstone and decorations
Press one of the decorated tombstone cookies into each cup (standing upright if possible). Then place gummy worms, candy pumpkins, ghosts, eyeballs, or other spooky candies atop and around the tombstone. -
Chill & serve
Refrigerate the cups for at least 30 minutes (or until fully chilled). Add final decorations right before serving, to keep cookies and candies crisp.
Servings and timing
-
Servings: about 6 to 9 (depending on cup size)
-
Prep time: ~15‑20 minutes
-
Chill / setting time: ~30 minutes (or more)
-
Total time: ~45 minutes
Variations
-
Use vanilla pudding or other flavors (add cocoa or food coloring) for contrast.
-
Make a peanut butter version: use peanut butter pudding or swirl in peanut butter.
-
Swap the chocolate sandwich cookies for gluten-free or alternative cookies.
-
Decorate with cookie ghosts, edible eyes, candy bones, or any Halloween‑style candy.
-
Serve in a trifle dish or large bowl, layering many cups together.
Storage / Reheating
-
Refrigerator: Store the assembled cups in a covered container for up to 3 days.
-
Toppings: I recommend adding the tombstones and candy decorations just before serving, since they can absorb moisture and become soggy if left too long.
-
(No reheating necessary — they’re served chilled.)
FAQs
Can I make these ahead of time?
Yes — I usually prepare the pudding and crush cookies in advance. I’ll assemble everything a few hours before serving, but I delay placing the cookie tombstones and gummy candies until just before serving to maintain crispness.
What cookies make good “dirt”?
Chocolate sandwich cookies (like Oreos) work perfectly. I crush them to fine crumbs to look like soil. You can also use any chocolate cookie you prefer or a gluten‑free version.
How do I get the tombstones to stand?
I partially insert the tombstone cookie into the pudding mixture so it’s anchored. If the mixture is too soft, chilling it for a bit before inserting them helps. Another trick: press a little extra pudding behind the cookie to “glue” it in place.
Will the cookies get soggy?
Over time, yes — especially the cookies on top. That’s why I delay layering those reserved crumbs or placing the tombstone cookie decorations until just before serving.
Can I scale this recipe up or down?
Absolutely. I adjust quantities proportionally. For a crowd, I use more cups or a larger glass dish and layer accordingly. For smaller servings, I use smaller cups or halve the recipe.
Conclusion
These Graveyard Dirt Cups are a fun, spooky dessert that brings together creamy chocolate pudding, crunchy cookie “dirt,” and playful decorations in individual portions. They’re perfect for Halloween or any themed party, and I love how customizable they are. If you like, I can send a printable version with exact measurements.
PrintGraveyard Dirt Cups
These Graveyard Dirt Cups are the ultimate spooky Halloween dessert! Layers of creamy chocolate pudding, crushed cookie “dirt,” and edible tombstone decorations come together for a no-bake treat that’s as fun to make as it is to eat. Perfect for Halloween parties, kids’ gatherings, or any themed celebration — creepy, creative, and irresistibly delicious!
- Prep Time: 20 minutes
- Cook Time: 0 minutes
- Total Time: 45 minutes
- Yield: 6–9 servings
- Category: Dessert
- Method: No-Bake
- Cuisine: American
- Diet: Vegetarian
Ingredients
- 1 package instant chocolate pudding mix
- 2 cups cold milk
- 1 tub whipped topping (Cool Whip or whipped cream)
- 20 chocolate sandwich cookies (like Oreos), crushed
- 6–9 Milano cookies, wafer cookies, or light-colored cookies (for tombstones)
- Black icing or melted chocolate (for decorating tombstones)
- Gummy worms
- Candy pumpkins
- Candy eyeballs, ghost candies, or Halloween sprinkles
- Optional: edible grave decorations like bones or ghosts
Instructions
- Use a food processor or rolling pin and bag to crush cookies into fine crumbs. Reserve a bit for garnish.
- Whisk pudding mix with cold milk until it begins to thicken. Fold in whipped topping until smooth.
- Write “RIP” or spooky designs on cookies using black icing or melted chocolate. Let set.
- In clear serving cups, layer crushed cookie crumbs, pudding mixture, and repeat. Finish with a top layer of crumbs.
- Press tombstone cookies into each cup and add gummy worms, candy pumpkins, or other spooky decorations.
- Refrigerate at least 30 minutes before serving. Add final decorations just before serving for the best texture.
Notes
- Assemble cups a few hours in advance but add decorations right before serving to avoid sogginess.
- For variation, try vanilla pudding, peanut butter pudding, or gluten-free cookies.
- Great for making ahead — store covered in the fridge up to 3 days.
Nutrition
- Serving Size: 1 cup
- Calories: 280
- Sugar: 22g
- Sodium: 310mg
- Fat: 12g
- Saturated Fat: 6g
- Unsaturated Fat: 4g
- Trans Fat: 0g
- Carbohydrates: 38g
- Fiber: 1g
- Protein: 3g
- Cholesterol: 10mg


